Step by Step with photos!
When I first learned to quilt, I was basically flying blind. The only thing I knew about sewing in general was how to stitch a straight seam. That was it. However, because I have a ‘math brain’, that straight seam was all it took to start me on the path to how to design a quilt pattern!
When first learning how to design a quilt, it’s best to grab the basics:
- Graph paper
- Pencil
- Eraser
- Colored pencils / Markers / Crayons
I can’t emphasize enough about the eraser. Relying simply on the little erasers that come on the end of a pencil probably won’t cut it. Sometimes I’d burn through those on the first block. To err is human. Am I right!? 😊
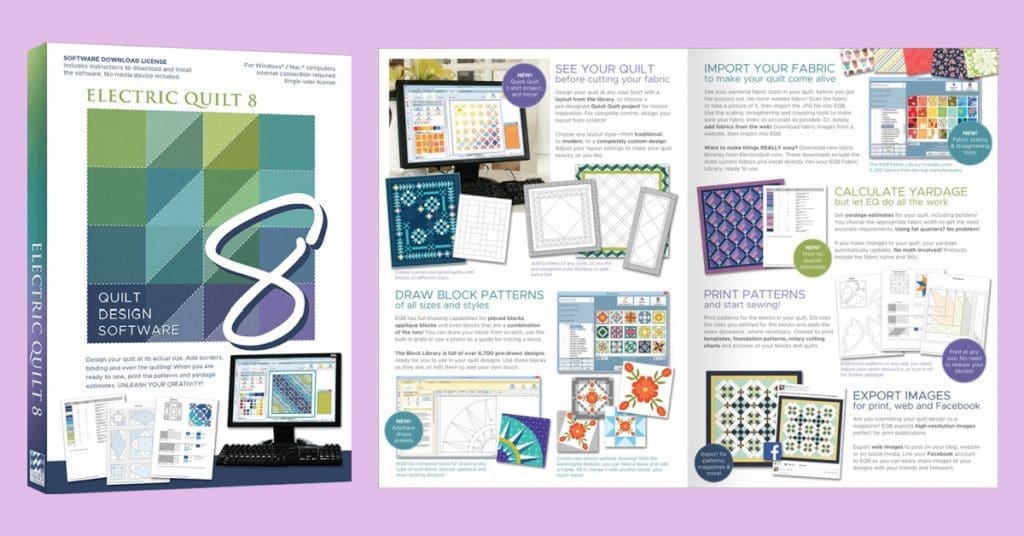
PRO TIP: If you’d like a little more ease in drawing, designing and color/fabric play, I definitely recommend Electric Quilt program, or EQ8. It’s very user friendly, comes with a TON of blocks to choose from and is what I use in all my quilt pattern designing. PLUS, the program will break down the cutting math and seam allowances for you.
Begin With the Basics
The best place to begin is with some basic traditional quilt blocks. You can use 1 or 2 quilt blocks. Or, as many as you like. For your first quilt design, I’d highly recommend starting with any quilt blocks that include:
- Squares
- Half Square Triangles (HST)
- Strips
Working with curves can be a bit trickier with the math portion so we can get into those after mastering the basics. Gotta walk before we run!
For this sample quilt, I’ve chosen to work with the 9 Patch, Ohio Star and the Pinwheel blocks in a 9 block quilt top design.
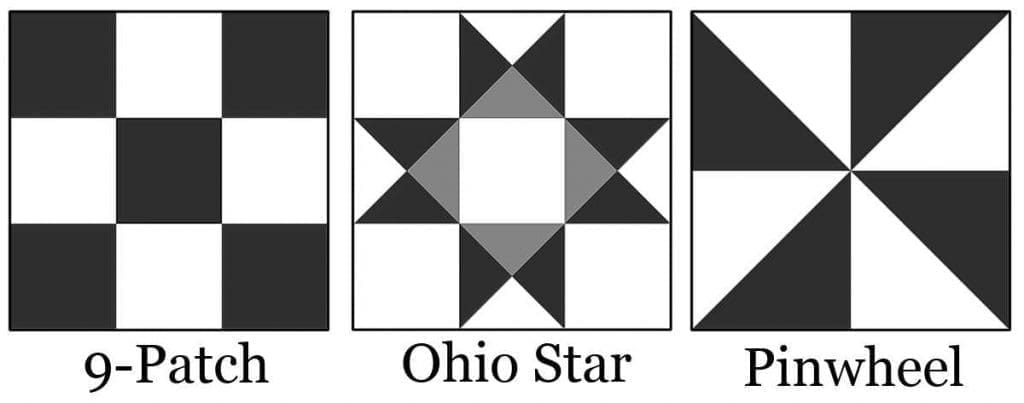
Pro Tip: When choosing your quilt blocks, make sure their finished sizes are all divisible by the same number. For instance, if you have a 9 inch block, you’ll want all of your finished blocks to be divisible by 3 (6 inches, 9 inches, 12 inches, etc.) This way all the blocks will fit nicely into your overall design.
Borders or Sashing?
I am a big fan of quilt borders. Not only do they frame the quilt top nicely, but you also don’t have to worry about your binding covering up your beautiful block points. 😊
However, sashing I take on a quilt by quilt basis. My rule of thumb for sashing is: Only use them if you want your individual blocks to stand out on their own.
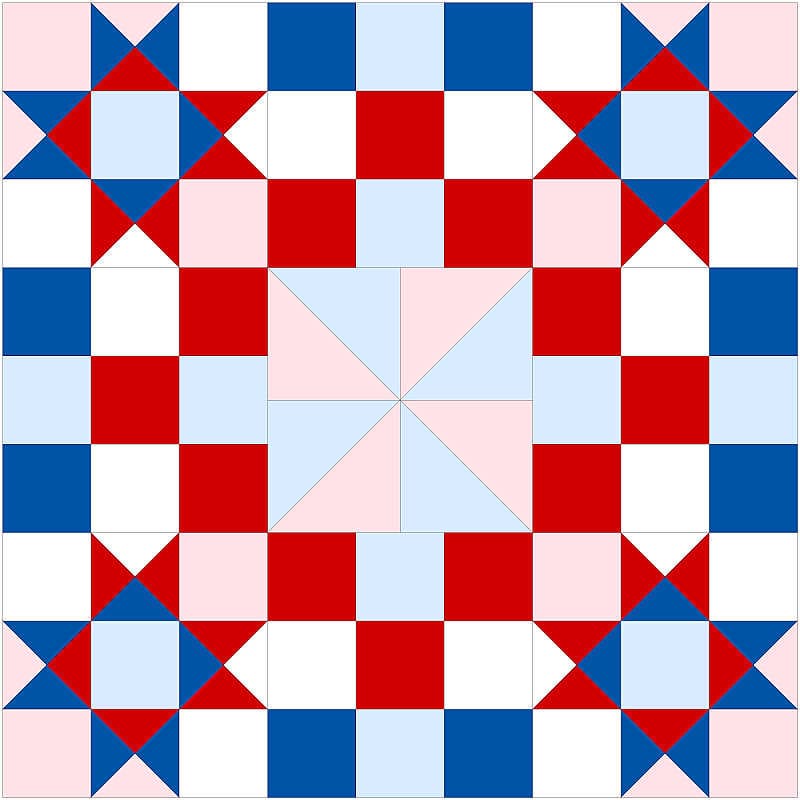
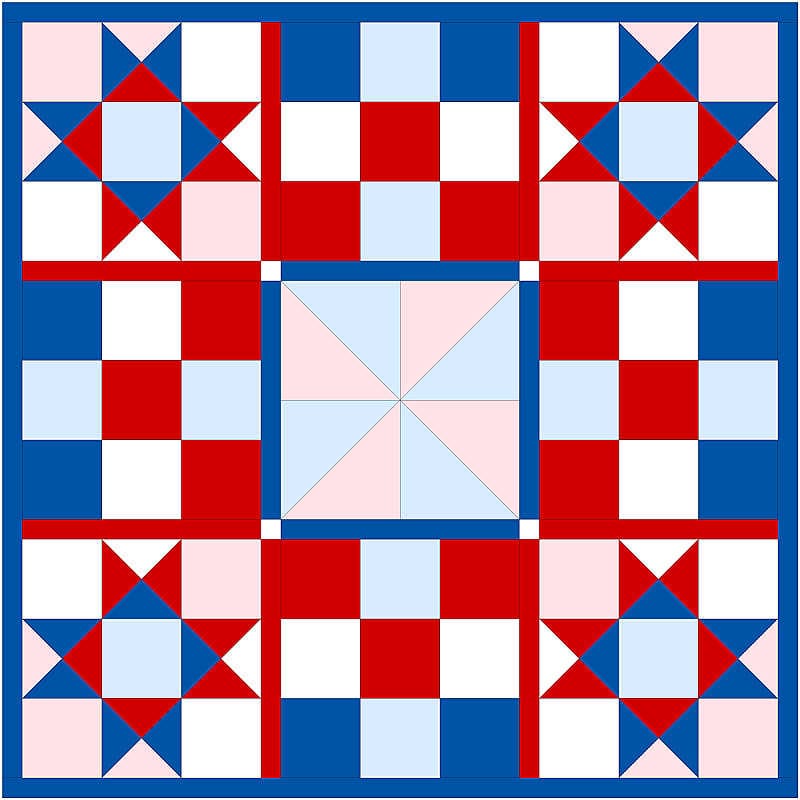
Not using a sashing allows you to use the colors and fabrics placement for the blocks to take on a whole new design when placed together. For instance, take a look at how my sampler would look with and without the sashing. Which parts of the design stand out the most?
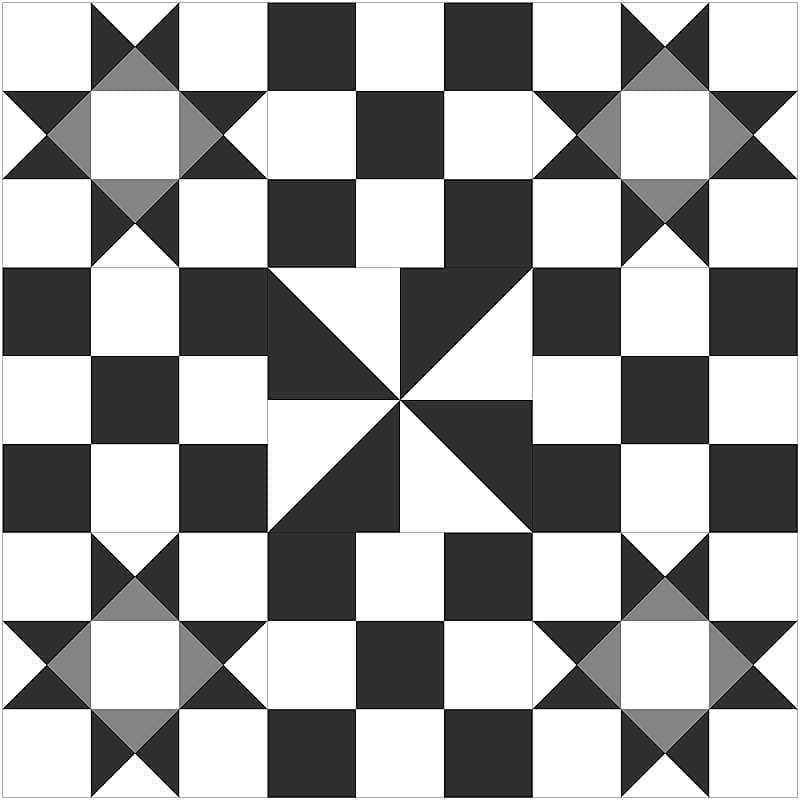
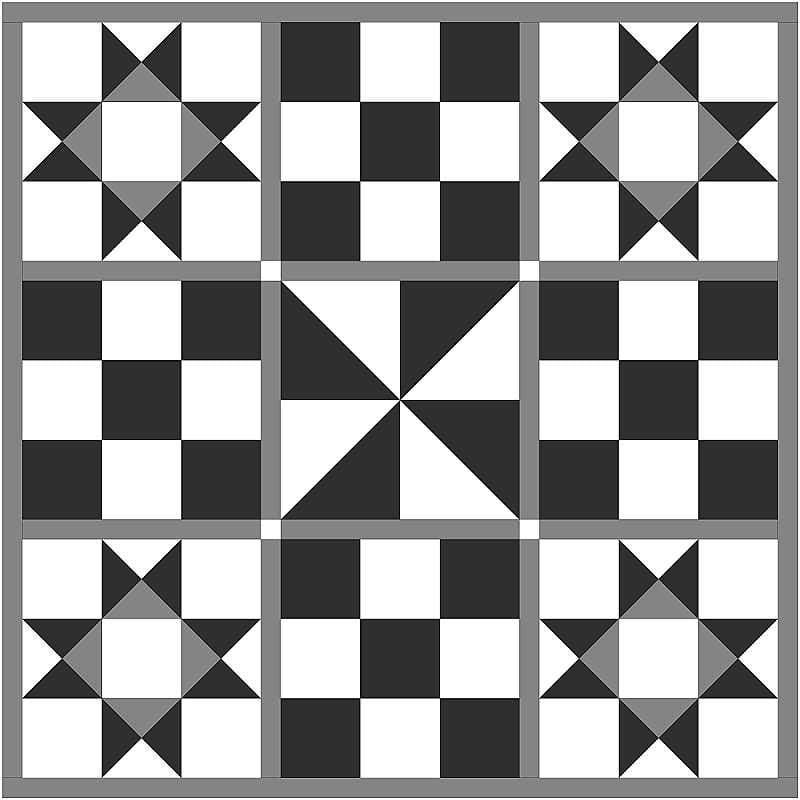
I highly suggest playing around with both sashing and not sashing your quilt pattern designs. Then play around more with your fabric placement. How many different quilt pattern designs can you create using the same blocks?
Look what happens when I added in color!
-
 Life Happens, Quilting Helps Quilting T-Shirt UnisexOriginal price was: $25.00.$15.00Current price is: $15.00.
 -
Traveling Quilter T-shirt – Unisex$20.00
-
Quarter Inch Club Quilting T-Shirt UnisexOriginal price was: $25.00.$15.00Current price is: $15.00.
-
Kiss My Stash Quilting T-Shirt – UnisexOriginal price was: $25.00.$15.00Current price is: $15.00.
-
Traveling Quilter 18 oz. Travel MugOriginal price was: $25.00.$15.00Current price is: $15.00.


Math is Our Friend!
This is the part that most quilters dread. The MATH. Even though I do have a ‘math brain’ (I literally see numbers in my brain), there are a few simple rules that will allow you to create even your largest quilts with little math gymnastics.
Rule #1: DON’T FORGET YOUR SEAM ALLOWANCE.
This may seem like a ‘no-brainer’ but even I sometimes forget to add in the proper 1/4 seam allowance when calculating my fabric and cutting sizes. This is especially true if you’ve been staring at numbers all day and your brain is tired. It happens to the best of us. 😊
Rule #2: As stated above, make sure your blocks are divisible by the same number.
Usually, this will be either by 2 or by 3.
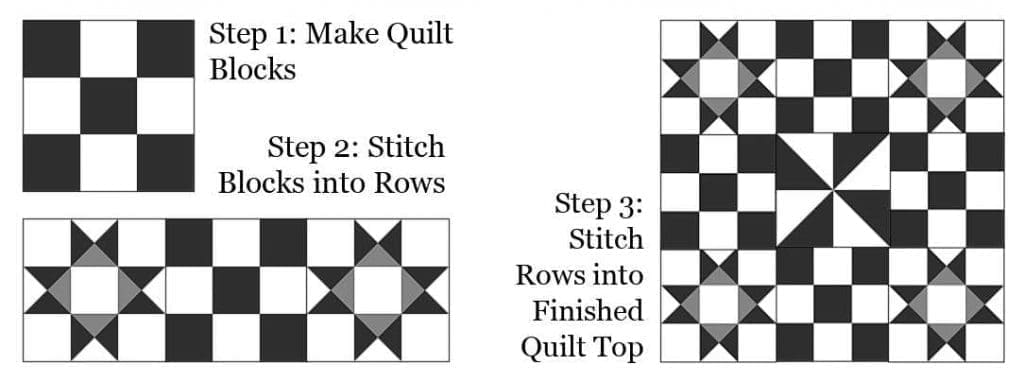
If you’ve ever made a quilt, you’ll notice they go together in stages. First, the blocks are made. Then the blocks are stitched together either in rows or in larger blocks, or segments. Then the rows or segments are stitched together into the finished quilt top.
While you can technically fit uneven quilt blocks on a page, it becomes much more difficult to line them up into the larger rows or segments to create your finished top.
However, if you do want to use uneven finished blocks, you can always add extra smaller pieces to fill in the gaps.
Rule #3: When cutting squares, always add ½ inch for your seam allowance.
For instance, if your finished square is 4 inches, you will need to cut a 4 ½ inch fabric square.

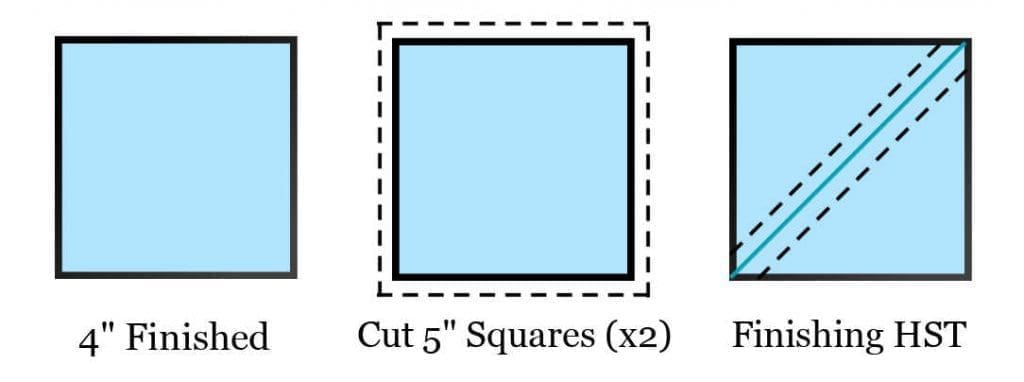
Rule #4: When cutting half square triangles (HST), always add 1 inch to your finished block size.
For instance, if my finished HST is 4 inches. I need to cut TWO 5 inch squares. This way, after they’re stitched together, there’s plenty of room to trim them down to your required 4 ½ inch UN-Finished HST quilt square.

PRO TIPS
PRO TIP #1: When adding sashing to your blocks, I like to add approximately ½ inch for every 2 – 3 inches of quilt block. For example, if your finished block size is 6 inches, I would add a 1 or 1 ½ inch sashing.
PRO TIP #2: For border sizes, I recommend adding in a 2 inch border for Twin/Full size quilts and a 3 – 4 inch border for Queen size and above.
Finishing Touches
Now all that’s left is to calculate your fabric requirements (EQ8 will do this for you too) and test your quilt blocks. Then, you’re off to the races!
*Disclosure: Please note that some of the links above may be affiliate links. When you click and purchase an item I earn a commission at NO additional cost to you. All the money raised helps to keep this blog up and running.

RELATED POSTS:
- More fun Quilting Projects
- Great stories from O’er at the Pond’
- Complete list of all the Quilt Shops in the US
- Complete list of all the Quilt Shows around the world
- Planning a Road Trip? Start HERE!
Do you know someone who’d love to learn how to design a quilt? Click the buttons below to share with your friends! Then be sure to join us in the Traveling Quilters group on Facebook for more travel adventures!
more on the blog


from the e-store
-
Traveling Quilter BooksPrice range: $14.95 through $39.90
-
Quilted Keychain Pattern (PDF)$5.00
-
Quilter’s Travel Journal – Shows and Retreats$19.95
-
Water Crystals Quilt Pattern$12.00
-
Winter 3-in-1 Table Quilts Pattern$12.00
-
Quilter’s Bucket List Challenge – Spring Workbook$9.95
-
Stargazer Quilt Pattern$12.00
-
Stonehenge Quilt Pattern$14.00
I would like to make special quilt for my husband who quite ill and in assisted living. He has travelled
and always gets a T-Shirt with name of place & other misc information. I would like to make him a
quilt of his T-Shirt travels. How do I start, and what kind of pattern would be good for this design?
Thanks for any help and info you might give. I am a newby quilt person.
For t-shirt quilts, I would highly suggest finding a YouTube video to walk you through the process as it’s easier to see it done versus attempting to write it out. That said, for my t-shirt quilts, I use a featherweight fusible interfacing to adhere to the backs of the shirts. That makes them easier to cut and stitch together.
Some people like to simply cut the shirt fronts at 12 1/2 x 12 1/2 square. While this makes things uniform, sometimes doing this will not allow the entire shirt design to fit. I, personally, measure each shirt image and work them into my own quilt design so that all of them fit. This requires a significant amount of math, which many people don’t like to bother with. 🙂
Also, some people like to use a sashing fabric in between the shirt designs. Other’s don’t. That’s a personal preference.
As I mentioned, making a t-shirt quilt is much easier to show than to write. However, there are great videos on YouTube that can walk you through the process. Good luck!